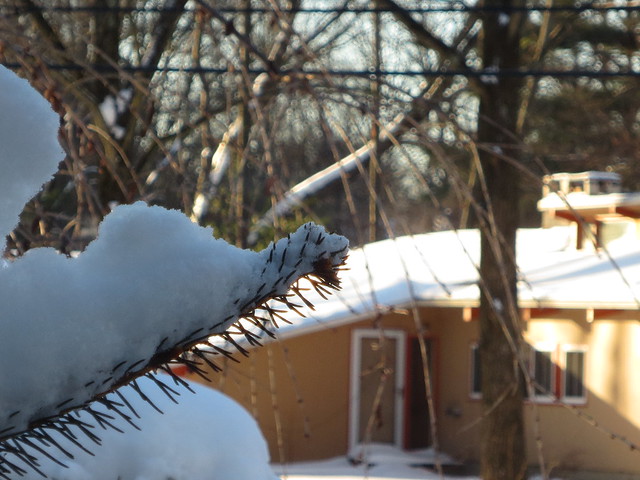
It snowed here recently, so I took a photo of a branch with some snow on it, which came out decently enough, but it prompted me to think: what would this look like at different apertures – or even different sensor sizes? So I decided to perform a little photography experiment to find out, and these were the results.
 First is the original photo – taken at f/5.6, at max zoom (200mm, equivalent to 400mm on a full-frame camera) using my Lumix G2 camera. Even on my smaller micro four-thirds sensor, you can see that the background is completely blurred out – even more so than I could’ve gotten with my f/1.7 lens!
The depth of field in this photo is very shallow – if you look closely at the bottom right of the photo, you can see the bottom part of the branch is slightly out of focus (because it was angled slightly towards me). This gives you an idea of how thin a “slice” of the scene was in focus.
 Next, I changed the aperture to f/22, but kept everything else the same. As you can see above, the background is still blurred out, but not as much. It is still blurred somewhat because I was focusing on a branch just a few feet in front of me, while the background is easily another hundred feet beyond that.
Compared to the first photo, you can see that the bottom bit of the branch is in focus – meaning the depth of field was greater, and a thicker “slice” of the scene was in focus.
 Finally, for this last picture I switched to a different camera – a compact Canon PowerShot ELPH 320. The aperture here is f/5.9, nearly the same as my very first shot, but as you can see the background is hardly blurred at all! The depth of field here is very deep – a very large portion of the scene is in focus.
Unfortunately, the little compact camera I was using couldn’t zoom to the same focal length – so this photo is at the equivalent of 255mm, instead of 400mm, and that contributes to the greater depth of field as well.
However, the smaller sensor size also has a significant impact – because the sensor is so small, there’s less room for the light to be “smeared out” (as it were), and so less of the background can be blurred.
So, what did we learn from all this? All else being equal:
- A larger aperture (a smaller f-number) provides less depth of field and allows for a more blurred background.
- A longer focal length (zoomed in more) provides less depth of field and allows for a more blurred background.
- A larger sensor allows for less depth of field, which allows for a more blurred background.
This is why compact & cell phone cameras – which usually don’t have large apertures, don’t have long focal lengths, and have small sensors – are at a serious disadvantage when it comes to getting shallow depth of field & that nice blurred-out background look.
Nothing here is terribly ground-breaking in itself, and all of this should be basic “photography 101” stuff, but I still think that actually performing photography experiments like this can be incredibly useful, in the same way that performing physics or chemistry experiments can be useful even if you already know the theory behind it.
As for myself, experiments like this help me develop an intuitive “feel” for how all the different settings and elements work together, so that I can just take the photos I want to take, without having to spend too much time thinking about which setting affects which aspect of the photo.
Perhaps this experiment will help you in the same way, or perhaps it will inspire you to perform your own photography experiments. Either way, I hope it’s been helpful, or at least enjoyable!